For a while now I’ve been thinking about building a new, more beefy, version of my home lab. I’m running some nested VMware labs, which require a lot of hardware. This renewal will involve, once again, replacing the underlying hardware. Thinking about this brought me back to the good old days when I bought my first own server, which was of course sponsored by my father. I figured, why not do a write-up blog about all the different versions of ‘home lab’ I’ve had?
Table of Contents
My first server
While still living at home, and during my vocational education, my dad supported me to run a server at home. The server was an Acer Alto G330 Mk2 tower that had a whopping 4 GB of RAM. For the Operating System (OS), I installed Windows Server 2008 R2 and, actually, the main thing the whole server did, was being a router with Microsoft Routing and Remote Access. Since it was the main router in the house, I learned to plan any changes or reboots. With the server offline, my family would complain that the internet connection is not available. Also, stability was very important because my multiplayer games would lag like crazy. This server was a “because I can” project, so I also installed IIS for hosting a website. My main hosting, however, was with a renowned hosting company in the Netherlands. After running this server at home for about a year and a half or so, I decided that it was time for a change, and I ended up selling the Acer. For the next couple of years, I just ran my QNAP NAS at home to host a storage solution for my family.

Renting hardware
While I was hosting websites with a renowned hosting company, I always thought it’d be nice to host this on my own server and be fully responsible for that. Sometime in July 2015, I decided to rent a single dedicated server at, So You Start (SyS). The servers at SyS are not the most expensive to rent, and SyS is a daughter company of OVH, so it has a good reputation. With the hardware available, it was time to choose an OS for the server. The SyS portal provided many options like VMware ESXi and Citrix XenServer. Now, back during my vocational education, I invested the time to get acquainted with Citrix XenServer 5 and got certified. With XenServer, at the time, also being free of charge, there was only one option left. Therefore, installed XenServer on the hardware, which was a very pleasant upgrade from the previous home server. On board, I had access to 4 CPU cores at 3,2 GHz each with 32G RAM and 3×120 GB SSD in a Software RAID.
This whole setup gave me a huge learning curve. I mean, I went from a shared web hosting environment to having everything in my own hands. Now I needed to arrange public IP addresses and harden the VMs that then got a public IP address. On one VM I installed some software for hosting websites with email and installed two more VMs for DNS. I educated myself with the help of Google and Stackoverflow and I can safely say that many mistakes were made.
Since the server is mainly limited by available disk space, I thought it’d be nice to thin provisioning all the VM. Thin provisioning is a technique that allows you to, for example, allocate a 250 GB hard disk for a VM and not use the full size as long as it’s not being used by the VM. Instead, it’ll only use the amount you’ve actually put on the hard disk, maybe 25 GB.
Well, let’s just say I came back on the thin provisioning decision quickly! If you apply this logic too often and one hard disk starts to grow and consume more and more space, you can easily run out of disk space completely. Too frequently, VMs were completely frozen because there was simply no disk space left on the server, which lead to kernel interrupts all over. The default installation provided a software RAID, but that meant that I’ve lost 1/3 of disk space to redundancy. There was no way to change this during the installation, so I learned how to manipulate the software RAID while the server was booted.
Working with these rental servers was great fun and I learned a lot, but it also had its downsides. I once switched servers to refresh the XenServer installation and was confronted with an intermittently failing server. The uptime never really came above 20–30 days before it crashed, sadly the hardware diagnosing tool showed that everything was fine, so support didn’t really want to do too much. Therefore, I ended up switching hardware again and all issues disappeared, and vanished into thin air.
![]()
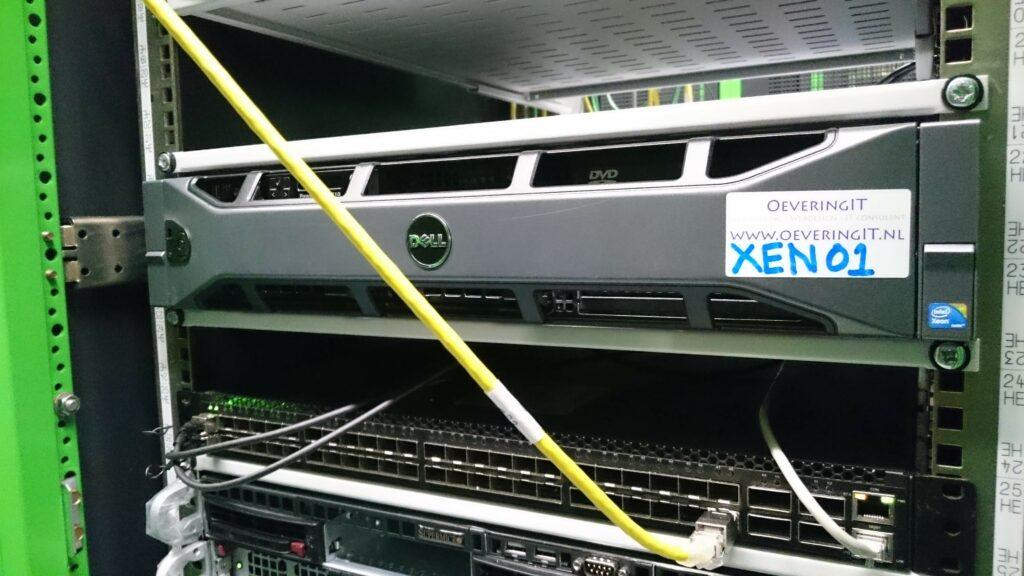
Own hardware, first version
In mid-2017, I managed to get my hands on my first, very own, physical server. It came in the form of a lovely Dell PowerEdge R710 that had two CPUs adding up to 21 GHz with a massive 144 GB of memory. Sadly, it came without any hard drives, so I bought four 1 TB Samsung Pro SSDs which I placed in a RAID-5 setup. Additionally, I added a 2 TB HDD for simple storage like backups and that sort of stuff.
Around the same time, I got to know High5 which offers co-location services for servers. Owning the hardware and knowing the right person made it so that in July 2017 this singular server was co-located in DC2 of XS4ALL in Amsterdam. Since not much changed in my knowledge about hypervisors, the OS I installed on the server was again Citrix XenServer.
In September 2018, I started as a student at the University of Applied Sciences in Utrecht and this server helped a lot during my studies. A lot of assignments require some form of collaboration in a team, and the server offered me the possibility whenever needed. I also ran GNS3 server, so it even helped me with the Cisco lessons. Having these resources available was amazing, and it was all available with a few clicks of the mouse or a few keystrokes.
Besides hosting stuff for school, the server was still mainly used to host the services that I started hosting on the SyS server. With the move to own hardware, they were all moved as well. So the server is also running VMs for things like web hosting with DNS, email and for managing the infrastructure I ran a virtual router in the shape of VyOS, and I’ve installed a Windows jump host.
Own hardware, second version
Within a couple of months after I got my hands on the Dell PowerEdge R710, I also managed to get my hands on not one, but two very nice Dell PowerEdge R720 servers (late 2017). I really wanted to get these bad boys into DC2, but I knew it would be too expensive to do so. Sadly, they have been collecting dust for almost two and a half years before I found the financing to get them into the DC. In the meanwhile, I managed to collect some additional hardware, like network cards and hard disks. These new servers gave the available resources a big boost in now having four CPUs with a total of 88 GHz of CPU with 512 GB of RAM and roughly 17 TB of storage available in the cluster.
I ended up switching the R710 for the R720 around October 2020. At this time, I’ve been working mainly with VMware products for about two years. That made it time to change the OS of the servers from Citrix XenServer to VMware ESXi. I build out a whole configuration, which is available to read about in an earlier blog. One thing I really like is how stable the lab is, it’s been very resilient, and I’ve hardly had any unplanned downtime since it’s been up and running.
The only main issue I now have is that there is a broken SD card in one of the servers which needs replacement. Other than that, I’ve had no hardware failure at all. This lab is my main playground for stuff while still providing web hosting services as I did in the past. At this point, I’m not actively marketing web hosting any more because it just takes up too much time. In the future, I need to see what I want with it, but for now, it’ll just hang around.
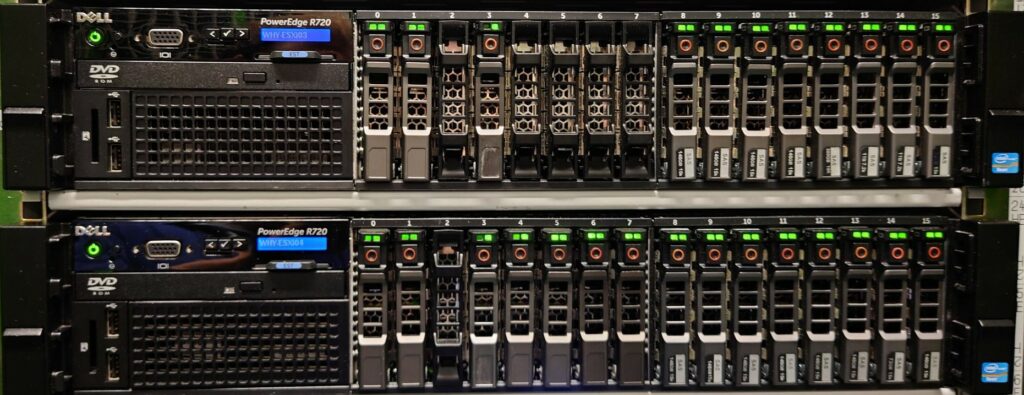
No worries, of course, I have the bezels, but this just makes a nicer photo without them. Also, in the meanwhile, the servers were moved from DC2 XS4ALL to Amsterdam Data Tower.
Own hardware, third version?
So, with all these previous labs, am I looking into a new version of the lab? I can only say: Hell yeah! I’m not done with these servers yet and already succeeded in getting my hands on more hardware. Not only that, but I’m looking into building the ultimate two-node lab environment. At this point, I’m looking into building a two-node vSAN cluster, mainly to provide data redundancy and better resiliency for when a host would be offline. I’m looking into the possibility of using a Raspberry Pi as a witness, or maybe the vExpert NUC that I have lying around. I know the Raspberry Pi Witness has been done before by Nathan Hudson and William Lam, but it’s still a very cool configuration.
This whole lab is anyway “because I can” so why not add some high-speed networking? Would benefit the vSAN replication traffic as well. So, let’s aim for 25-40 Gbps of network speed between the servers. When I’m busy with network connectivity anyway, at this moment I have a 1 Gbps uplink to the core network which could be upgraded to 10 Gbps if the port is UTP so that would be an awesome upgrade as well. When that version is finished, I’ll definitely write a new blog to show how this configuration has ended up.

Closing thoughts
Thanks for reading! Hopefully, you found it interesting and maybe you’ve even learned something new! Want to read more about my version 3 lab? Leave your email address down below to subscribe! Any questions or just want to leave a remark? Please do so, I’m always curious to read what you think of my content. Enjoy your day!