Welcome to part 2 of my blog series about the network configuration that I build for my VyOS routers! In part 1 I gave a design overview and in this part, I’ll write about the firewall configuration and configuration for services like DHCP, DNS, and NTP.
Interested in the complete story and configuration? You can find all parts of this blog series listed here once they are online:
Firewall configuration
Like any router, VyOS has the ability to set a group of firewall rules on an interface. The VyOS router is the boundary between my internal network and the evil outside the network -the internet. For me, the VyOS router has two main functions: being a router and providing security. Since, in my case, security is done with the firewall functionality of the VyOS router, the configuration of that firewall is of utmost importance. For example, in the lab, I’m running a Windows 10 VM that I use for managing the lab environment -also known as a jump host/steppingstone/bastion host.
The Windows 10 VM provides me the ability to, remotely, login and take control of mentioned Windows 10 VM. Now, it’s not wise to set the ‘Remote Desktop Protocol‘ (RDP) port open to the whole internet; the VM will be hacked within hours, if not minutes as I experienced in the past. Even though I used strong passwords, hackers found an account with a weak password and installed a crypto miner on my jump host. For that reason, I’ve now started using a ‘whitelist’ that allows me to accept only network traffic to the RDP port from trusted IP-addresses and deny access to the rest of the internet.
In VyOS there are firewall groups defined that contain the actual firewall rules. My main focus will be on the firewall groups that contain the firewall rules for IPv4. The VyOS router will also have a working IPv6 address but that configuration will come later, for now, a basic ruleset for IPv6 will be sufficient. The ruleset for IPv6 can always be extended at a later time.
A main part of the firewall is to allow the network traffic that is needed to set up the Site-to-Site IPsec- and L2TP VPN connections. The Site-to-Site tunnel will be used to connect to my home network whereas the L2TP connection is used for when I’m not home and need to connect to the network anyway. Other than that, the firewall must allow legitimate network traffic and reject or drop all other not-needed network traffic.
Both VyOS routers will have exactly the same firewall configuration- so that’s easy enough: the configuration can be duplicated. The configurations that I use are based off a configuration that I found on my Ubiquiti USG, so a big shoutout to our friends at Ubiquiti for making my life easier! With that basis, I’ve started to extend the configuration that I actually need. The configuration that I share in these blogs have some information redacted, as the full configuration would show way too much information.
» Click here to show the firewall configuration
set firewall all-ping 'enable'
set firewall broadcast-ping 'disable'
set firewall group address-group RDP-GROUP address 'redacted'
set firewall group address-group RDP-GROUP address 'redacted'
set firewall group address-group RDP-GROUP address 'redacted'
set firewall group address-group RDP-GROUP address 'redacted'
set firewall group address-group RDP-GROUP address 'redacted'
set firewall group address-group RDP-GROUP address 'redacted'
set firewall group address-group RDP-GROUP address 'redacted'
set firewall group address-group S2S-GROUP address 'redacted'
set firewall ipv6-name LANv6_IN default-action 'accept'
set firewall ipv6-name LANv6_IN description 'packets from intranet'
set firewall ipv6-name LANv6_LOCAL default-action 'accept'
set firewall ipv6-name LANv6_LOCAL description 'packets from intranet to gateway'
set firewall ipv6-name LANv6_OUT default-action 'accept'
set firewall ipv6-name LANv6_OUT description 'packets forward to intranet'
set firewall ipv6-name WANv6_IN default-action 'drop'
set firewall ipv6-name WANv6_IN description 'packets from internet to intranet'
set firewall ipv6-name WANv6_IN rule 3001 action 'accept'
set firewall ipv6-name WANv6_IN rule 3001 description 'allow established/related sessions'
set firewall ipv6-name WANv6_IN rule 3001 state established 'enable'
set firewall ipv6-name WANv6_IN rule 3001 state invalid 'disable'
set firewall ipv6-name WANv6_IN rule 3001 state new 'disable'
set firewall ipv6-name WANv6_IN rule 3001 state related 'enable'
set firewall ipv6-name WANv6_IN rule 3002 action 'drop'
set firewall ipv6-name WANv6_IN rule 3002 description 'drop invalid state'
set firewall ipv6-name WANv6_IN rule 3002 state established 'disable'
set firewall ipv6-name WANv6_IN rule 3002 state invalid 'enable'
set firewall ipv6-name WANv6_IN rule 3002 state new 'disable'
set firewall ipv6-name WANv6_IN rule 3002 state related 'disable'
set firewall ipv6-name WANv6_LOCAL default-action 'drop'
set firewall ipv6-name WANv6_LOCAL description 'packets from internet to gateway'
set firewall ipv6-name WANv6_LOCAL rule 3001 action 'accept'
set firewall ipv6-name WANv6_LOCAL rule 3001 description 'Allow neighbor advertisements'
set firewall ipv6-name WANv6_LOCAL rule 3001 icmpv6 type 'neighbor-advertisement'
set firewall ipv6-name WANv6_LOCAL rule 3001 protocol 'ipv6-icmp'
set firewall ipv6-name WANv6_LOCAL rule 3002 action 'accept'
set firewall ipv6-name WANv6_LOCAL rule 3002 description 'Allow neighbor solicitation'
set firewall ipv6-name WANv6_LOCAL rule 3002 icmpv6 type 'neighbor-solicitation'
set firewall ipv6-name WANv6_LOCAL rule 3002 protocol 'ipv6-icmp'
set firewall ipv6-name WANv6_LOCAL rule 3003 action 'accept'
set firewall ipv6-name WANv6_LOCAL rule 3003 description 'allow established/related sessions'
set firewall ipv6-name WANv6_LOCAL rule 3003 state established 'enable'
set firewall ipv6-name WANv6_LOCAL rule 3003 state invalid 'disable'
set firewall ipv6-name WANv6_LOCAL rule 3003 state new 'disable'
set firewall ipv6-name WANv6_LOCAL rule 3003 state related 'enable'
set firewall ipv6-name WANv6_LOCAL rule 3004 action 'accept'
set firewall ipv6-name WANv6_LOCAL rule 3004 description 'Allow DHCPv6'
set firewall ipv6-name WANv6_LOCAL rule 3004 destination port '546'
set firewall ipv6-name WANv6_LOCAL rule 3004 protocol 'udp'
set firewall ipv6-name WANv6_LOCAL rule 3004 source port '547'
set firewall ipv6-name WANv6_LOCAL rule 3005 action 'accept'
set firewall ipv6-name WANv6_LOCAL rule 3005 description 'Allow router advertisements'
set firewall ipv6-name WANv6_LOCAL rule 3005 icmpv6 type 'router-advertisement'
set firewall ipv6-name WANv6_LOCAL rule 3005 protocol 'ipv6-icmp'
set firewall ipv6-name WANv6_LOCAL rule 3006 action 'drop'
set firewall ipv6-name WANv6_LOCAL rule 3006 description 'drop invalid state'
set firewall ipv6-name WANv6_LOCAL rule 3006 state established 'disable'
set firewall ipv6-name WANv6_LOCAL rule 3006 state invalid 'enable'
set firewall ipv6-name WANv6_LOCAL rule 3006 state new 'disable'
set firewall ipv6-name WANv6_LOCAL rule 3006 state related 'disable'
set firewall ipv6-name WANv6_OUT default-action 'accept'
set firewall ipv6-name WANv6_OUT description 'packets to internet'
set firewall ipv6-receive-redirects 'disable'
set firewall ipv6-src-route 'disable'
set firewall ip-src-route 'disable'
set firewall log-martians 'enable'
set firewall name WAN_IN default-action 'drop'
set firewall name WAN_IN description 'packets from internet to intranet'
set firewall name WAN_IN rule 10 action 'accept'
set firewall name WAN_IN rule 10 description 'PortForward [RDP to DC-JUMP01]'
set firewall name WAN_IN rule 10 destination address '10.10.10.11'
set firewall name WAN_IN rule 10 destination port '3389'
set firewall name WAN_IN rule 10 protocol 'tcp'
set firewall name WAN_IN rule 10 source group address-group 'RDP-GROUP'
set firewall name WAN_IN rule 3001 action 'accept'
set firewall name WAN_IN rule 3001 description 'allow established/related sessions'
set firewall name WAN_IN rule 3001 state established 'enable'
set firewall name WAN_IN rule 3001 state invalid 'disable'
set firewall name WAN_IN rule 3001 state new 'disable'
set firewall name WAN_IN rule 3001 state related 'enable'
set firewall name WAN_IN rule 3002 action 'drop'
set firewall name WAN_IN rule 3002 description 'drop invalid state'
set firewall name WAN_IN rule 3002 state established 'disable'
set firewall name WAN_IN rule 3002 state invalid 'enable'
set firewall name WAN_IN rule 3002 state new 'disable'
set firewall name WAN_IN rule 3002 state related 'disable'
set firewall name WAN_LOCAL default-action 'drop'
set firewall name WAN_LOCAL description 'packets from internet to gateway'
set firewall name WAN_LOCAL rule 2000 action 'accept'
set firewall name WAN_LOCAL rule 2000 icmp type-name 'echo-request'
set firewall name WAN_LOCAL rule 2000 protocol 'icmp'
set firewall name WAN_LOCAL rule 2000 state new 'enable'
set firewall name WAN_LOCAL rule 2100 action 'accept'
set firewall name WAN_LOCAL rule 2100 protocol 'esp'
set firewall name WAN_LOCAL rule 2100 source group address-group 'S2S-GROUP'
set firewall name WAN_LOCAL rule 2101 action 'accept'
set firewall name WAN_LOCAL rule 2101 destination port '500'
set firewall name WAN_LOCAL rule 2101 protocol 'udp'
set firewall name WAN_LOCAL rule 2101 source group address-group 'S2S-GROUP'
set firewall name WAN_LOCAL rule 2102 action 'accept'
set firewall name WAN_LOCAL rule 2102 destination port '4500'
set firewall name WAN_LOCAL rule 2102 protocol 'udp'
set firewall name WAN_LOCAL rule 2102 source group address-group 'S2S-GROUP'
set firewall name WAN_LOCAL rule 2103 action 'accept'
set firewall name WAN_LOCAL rule 2103 destination port '1701'
set firewall name WAN_LOCAL rule 2103 ipsec match-ipsec
set firewall name WAN_LOCAL rule 2103 protocol 'udp'
set firewall name WAN_LOCAL rule 2104 action 'accept'
set firewall name WAN_LOCAL rule 2104 ipsec match-ipsec
set firewall name WAN_LOCAL rule 2104 source group address-group 'S2S-GROUP'
set firewall name WAN_LOCAL rule 3001 action 'accept'
set firewall name WAN_LOCAL rule 3001 description 'allow established/related sessions'
set firewall name WAN_LOCAL rule 3001 state established 'enable'
set firewall name WAN_LOCAL rule 3001 state invalid 'disable'
set firewall name WAN_LOCAL rule 3001 state new 'disable'
set firewall name WAN_LOCAL rule 3001 state related 'enable'
set firewall name WAN_LOCAL rule 3002 action 'drop'
set firewall name WAN_LOCAL rule 3002 description 'drop invalid state'
set firewall name WAN_LOCAL rule 3002 state established 'disable'
set firewall name WAN_LOCAL rule 3002 state invalid 'enable'
set firewall name WAN_LOCAL rule 3002 state new 'disable'
set firewall name WAN_LOCAL rule 3002 state related 'disable'
set firewall name WAN_LOCAL rule 3003 action 'accept'
set firewall name WAN_LOCAL rule 3003 destination port '22'
set firewall name WAN_LOCAL rule 3003 protocol 'tcp'
set firewall name WAN_LOCAL rule 3003 recent count '4'
set firewall name WAN_LOCAL rule 3003 recent time '60'
set firewall name WAN_LOCAL rule 3003 state new 'enable'
set firewall name WAN_LOCAL rule 3004 action 'accept'
set firewall name WAN_LOCAL rule 3004 destination port '22'
set firewall name WAN_LOCAL rule 3004 protocol 'tcp'
set firewall name WAN_LOCAL rule 3004 state new 'enable'
set firewall name WAN_OUT default-action 'accept'
set firewall name WAN_OUT description 'packets to internet'
set firewall receive-redirects 'enable'
set firewall send-redirects 'enable'
set firewall source-validation 'strict'
set firewall syn-cookies 'enable'
When looking through the configuration you can see that I use multiple groups of firewall rules- in total six. In the VyOS routers, it’s possible to apply a firewall group on a certain direction of network traffic, this being the directions IN, LOCAL, and OUT. To visualize where these firewall groups -or filters- are applied, I’ve created a schematic overview in the figure below. The IN filter is the first filter that network traffic encounters and therefore this is the best place to filter out not-needed traffic this prevents that unwanted network traffic from consuming valuable computing power of the router.
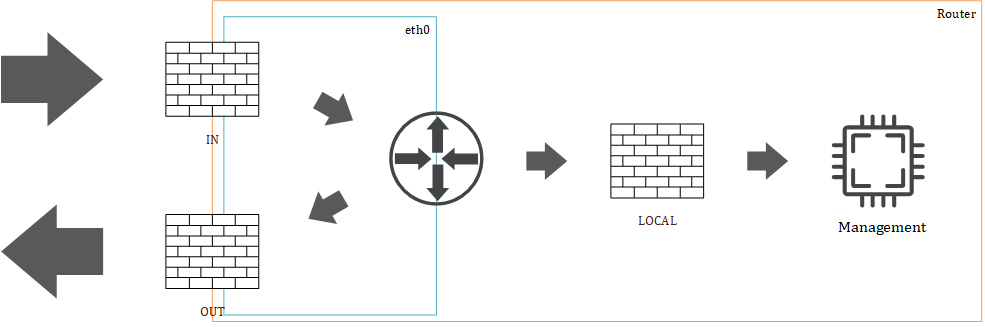
When the traffic is allowed through the IN filter it will continue to be routed and then there are two flavors of network traffic; network traffic that is meant for the router -LOCAL- or traffic that leaves the router via a network interface -OUT. An example of traffic that is meant for the router is management network traffic like ssh or a dynamic routing protocol as BGP (I’ll write about routing in part 5 of this blog series). An example of OUT network traffic is a VM accessing something that is on the internet. It is only possible to link one firewall group to a traffic direction and is unique for IPv4 and IPv6.
» Click here to show the interface configuration
These firewall groups and rules have to apply to the internet interface and that can be done by using the following six commands:
set interfaces ethernet eth0 firewall in ipv6-name 'WANv6_IN'
set interfaces ethernet eth0 firewall in name 'WAN_IN'
set interfaces ethernet eth0 firewall local ipv6-name 'WANv6_LOCAL'
set interfaces ethernet eth0 firewall local name 'WAN_LOCAL'
set interfaces ethernet eth0 firewall out ipv6-name 'WANv6_OUT'
set interfaces ethernet eth0 firewall out name 'WAN_OUT'
Dynamic Host Configuration Protocol
With the filtering/firewalling of the network traffic arranged I’d like every VM to be able to communicate with the outside world easily. The Dynamic Host Configuration Protocol (DHCP) is a protocol that makes sure that every VM is given a unique IP-address within a specified IP-range. The VM then uses that particular IP-address to communicate with the rest of the world.
It’s not obligated to use DHCP in the network because it’s also possible to set that information yourself statically. For the main VLAN -10- and the management VLAN -99- I want to have the possibility to just be lazy and let DHCP assign the IP-addresses to the VM’s. For communication outside the specified IP-range a default gateway is needed to handle this traffic. Also, the VM needs to know where the DNS-server can be found, how DNS works is described in the next chapter. Both the default gateway and DNS-server will be provided to the VM by DHCP.
I’m running two VyOS routers that both run DHCP, the VyOS routers need to know that there are multiple DHCP servers. Without this knowledge, both VyOS routers might assign a different IP-address to another VM. While configuring the DHCP server on the VyOS router it’s possible to make use of the built-in option for DHCP ‘failover’ that makes the VyOS router aware that there are multiple DHCP servers in the network. In the end, the EU-GW03 will be the primary router and the EU-GW04 will be secondary. For some VM’s I’ve told the DHCP server to always give that VM a specific IP-address. In VyOS it’s possible to create a static mapping between the MAC-address of a VM and an IP-address, for the configuration below I’ve removed those configuration lines.
» Click here to show the DHCP configuration
set service dhcp-server shared-network-name LAN authoritative
set service dhcp-server shared-network-name LAN subnet 10.10.10.0/24 default-router '10.10.10.1'
set service dhcp-server shared-network-name LAN subnet 10.10.10.0/24 dns-server '10.10.10.1'
set service dhcp-server shared-network-name LAN subnet 10.10.10.0/24 domain-name 'internal.wheatley.local'
set service dhcp-server shared-network-name LAN subnet 10.10.10.0/24 failover local-address '10.10.10.254'
set service dhcp-server shared-network-name LAN subnet 10.10.10.0/24 failover name 'LAN'
set service dhcp-server shared-network-name LAN subnet 10.10.10.0/24 failover peer-address '10.10.10.253'
set service dhcp-server shared-network-name LAN subnet 10.10.10.0/24 failover status 'primary'
set service dhcp-server shared-network-name LAN subnet 10.10.10.0/24 lease '86400'
set service dhcp-server shared-network-name LAN subnet 10.10.10.0/24 range 0 start '10.10.10.10'
set service dhcp-server shared-network-name LAN subnet 10.10.10.0/24 range 0 stop '10.10.10.200'
Domain Name System
The VM is well secured by the firewall, it has an IP-address and can communicate with the rest of the world but still is not fully functional. For the users working on the VM -and for many applications- a Domain Name System (DNS) is needed. DNS is a service that is responsible for translate a domain name to an IP-address. On the internet, servers are addressed by their IP-address and not by a domain name. This translation is handy as I think we’re better at remembering domain names better than IP-addresses. This blog, for example, is hosted on the domain bartoevering.nl, which translates into IP-address “46.23.84.200”.
For this blog post, I won’t go into how DNS exactly works but trust me, you don’t want to do without. Via the DNS server, it’s possible to block a big chunk of advertisement therefore I’ve installed a VM with Pi-hole that is built for that task. The VM with Pi-hole has the IP-address 10.10.10.5 and the VyOS routers will use this IP-address to resolve the DNS-queries for their clients. The Pi-hole already stores a cache with DNS records so the cache on VyOS is redundant and I’ll disable it.
Next to Pi-hole, I’m also hosting a Microsoft Active Directory (AD) that answers to DNS for the zone “wheatley.local”. The AD server is not reachable via the internet but it is hosting some DNS records for the local infrastructure. I’ve made a configuration where any request that ends on ‘wheatley.local’ will be caught and send to the AD server to resolve. All other DNS requests directly go to the Pi-hole to get resolved.
» Click here to show the DNS configuration
set service dns forwarding allow-from '10.0.0.0/8'
set service dns forwarding cache-size '0'
set service dns forwarding domain wheatley.local server '10.10.99.10'
set service dns forwarding listen-address '10.10.10.1'
set service dns forwarding listen-address '10.10.99.1'
set service dns forwarding listen-address '10.10.98.1'
set service dns forwarding listen-address '10.10.75.1'
set service dns forwarding listen-address '10.255.200.1'
set service dns forwarding system
set system name-server '10.10.10.5'
Network Time Protocol
The main ingredients for the network are now put into place and working, next I would like all VM’s to use the same timestamp. Therefore, I’ve configured the VyOS router as Network Time Protocol (NTP) client and server at the same moment. Did you ever wonder how your phone knows the time without you setting it by hand? Right, because of NTP telling it what the actual time is. We could do without NTP but it’s convenient to have the same time in the log files while troubleshooting multiple devices. By default, every VM or device that wants to know the time goes to a set of servers on the internet to request the time. In my network I want the VyOS routers to be the only ones to request the time on the internet and everything else in the network should request the time at the VyOS routers. I set the VyOS routers such that they will request the time at “nl.pool.ntp.org“.
» Click here to show the NTP configuration
set system ntp allow-clients address '10.0.0.0/8'
set system ntp listen-address '10.10.10.1'
set system ntp listen-address '10.10.75.1'
set system ntp listen-address '10.10.98.1'
set system ntp listen-address '10.10.99.1'
set system ntp server nl.pool.ntp.org
This concludes the blog for today! Everything is set and the VM’s now get secured by the firewall and are provided with DHCP, DNS and NTP. The next blog article will be about the interface configuration! For now, thanks for reading and hopefully you found it interesting and maybe even learned something new! Want to be informed about a new post? Subscribe! Any questions or just want to leave a remark? Please do, I’m very curious what you think of the content. Enjoy your day!