Welcome to part 3 of my blog series about the network configuration that I build for my VyOS routers! In part 1 I gave a design overview followed by part 2 with the firewall, DHCP, DNS, and NTP configuration. In this third part, I’ll be configuring the interfaces and describing something special called ‘VRRP’.
Interested in the complete story and configuration? You can find all parts of this blog series listed here once they are online:
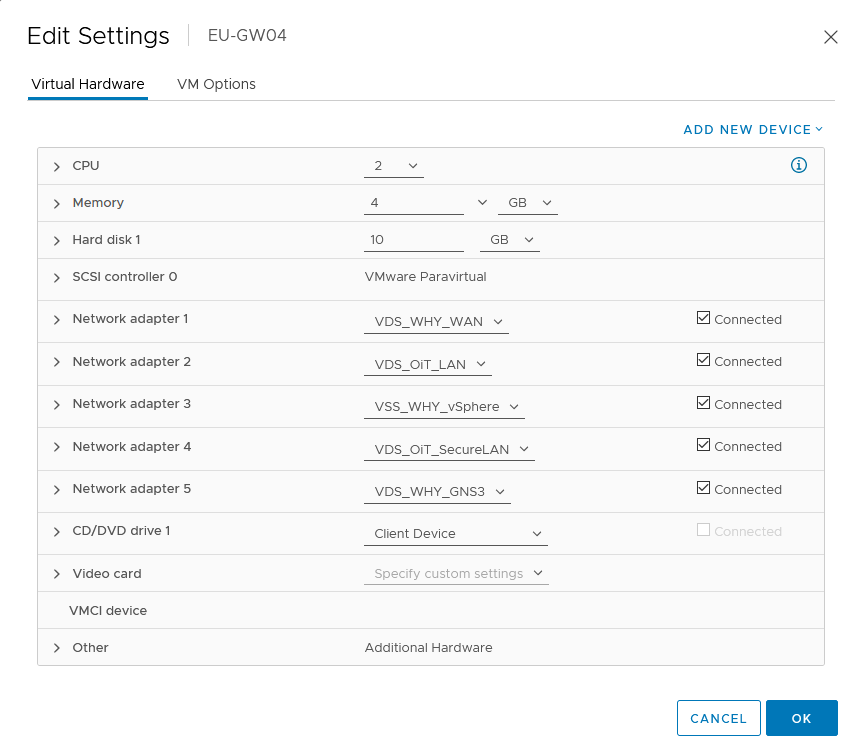
Interfaces
To separate the VLAN in VMware vCenter I’ve added a few “Distributed Port Groups”, one for every VLAN that I need. The Distributed Port Group provides separation of the VM’s because -in my case- a VM connected to one port group cannot communicate with a VM on another port group. Next to the planned VLANs, I added a few additional port groups for playing around but at this moment they don’t need a connection to the VyOS routers. In the future, I’ll do a blog about the virtual Distributed Switch (vDS) but for now, it’s enough to know that I use two vDS’es -one is for WAN and the other for LAN-traffic. Both VyOS VM’s are connected to the same port groups in VMware so that the interfaces are linked to the right ethernet ports in VyOS. With all VLANs added, each VyOS VM has five ethernet (eth) ports from which one port is for all public network traffic and the other four are for the internal VLANs.
For now, I’ve chosen to add each port group -VLAN- on a separate network adapter for the VyOS router. The number of VLANs might change in the future but adding more VLANs is quite easy in this way. However, I’m already thinking of changing the hardware to just have two network adapters on the VyOS routers. This because there is a hard limit of 10 network adapters per VM. In the new situation, the LAN network adapter will be a ‘trunk‘ where all VLANs are allowed. This construction would make adding more VLANs to the VyOS routers easier and more scalable. For this blog, however, I will use a separate network adapter per VLAN and this works just as well.
With all the interfaces connected it’s time to start thinking about IP-addresses. Without an IP-address communication is not possible. As the main IP-address for the redundant interface, I would like to use an IP-address that ends on one (10.10.xx.1) purely because it’s the first possible IP-address in the IP-range. This IP-address will be the default gateway address and therefore is reserved for the VRRP configuration that I create later.
I try to divide the IP-addresses quite logically because I find that it makes management much easier in case something breaks down. As both VyOS routers need a main IP-address for communication, I plan to assign the EU-GW03, 253 (10.10.xx.253) as IP-address on all interfaces, and the EU-GW04 will then make use of 254 (10.10.xx.254).
» Click here to show the interface configuration
set interfaces ethernet eth0 address 'XX.XX.XX.254/XX'
set interfaces ethernet eth0 firewall in ipv6-name 'WANv6_IN'
set interfaces ethernet eth0 firewall in name 'WAN_IN'
set interfaces ethernet eth0 firewall local ipv6-name 'WANv6_LOCAL'
set interfaces ethernet eth0 firewall local name 'WAN_LOCAL'
set interfaces ethernet eth0 firewall out ipv6-name 'WANv6_OUT'
set interfaces ethernet eth0 firewall out name 'WAN_OUT'
set interfaces ethernet eth1 address '10.10.10.254/24'
set interfaces ethernet eth1 description 'LAN'
set interfaces ethernet eth2 address '10.10.98.254/24'
set interfaces ethernet eth2 description 'VMWARE'
set interfaces ethernet eth3 address '10.10.99.254/24'
set interfaces ethernet eth3 description 'SecureLAN'
set interfaces ethernet eth4 address '10.10.75.254/24'
set interfaces ethernet eth4 description 'GNS3'
With the configuration in place, I next want to make sure everything is set correctly so let’s check if everything applied as planned using the command ‘show interfaces‘.
EU-GW04:~$ show interfaces
Codes: S - State, L - Link, u - Up, D - Down, A - Admin Down
Interface        IP Address                        S/L  Description
---------        ----------                        ---  -----------
eth0             XX.XX.XX.254/XX                   u/u
eth1             10.10.10.254/24                   u/u  LAN
eth2             10.10.98.254/24                   u/u  VMWARE
eth3             10.10.99.254/24                   u/u  SecureLAN
eth4             10.10.75.254/24                   u/u  GNS3
lo               127.0.0.1/8                       u/u
                 ::1/128
The configuration looks good so far! Let’s test the connection by pinging the default gateway of the VyOS routers, which is located at my hoster. That worked out well and the VyOS routers are also able to ping each other. At this point, I’m confident enough with the current configuration to continue building the configuration for Virtual Router Redundancy Protocol (VRRP).
Virtual Router Redundancy Protocol
In my network design, that I planned two VyOS routers are working together, but I decided that traffic will only pass through one of them at any given time -this is called a master/slave setup. With the use of VRRP, it becomes possible to have two routers working together as master/slave and it provides the ability to chose through with router the traffic will pass. The master -EU-GW04- will handle all the traffic by default and if there are any failures the slave -EU-GW03- takes over. The master and slave know the status of the other by exchanging so-called ‘heartbeats‘. As soon as the heartbeats stop, the slave assumes the master died and the slave then takes over the master role by starting to handle the network traffic. A more detailed look into how VRRP exactly works might be a nice topic for a future blog.
For every VLAN connected to the VyOS router, there will be a VRRP group with a fixed priority. For now, the EU-GW04 will be the master by having a higher priority than the EU-GW03. After I’m done with the configuration for the EU-GW04 I’ll start re-building the EU-GW03 and I’ll swap the priorities. I’ve set VRRP such that it uses an Authentication Header based on a password-this is to prevent anyone from hijack the network traffic and start playing ‘man-in-the-middle‘.
When the heartbeats resume from a master it’s the default for VRRP is to hand back the master role. Sometimes this behavior can cause an outage when the master for example is not fully booted yet. With the ‘preempt–delay‘ I make sure that the master is stable and completely booted before handing back the master role. On the internet side, there’s a VRRP group that will be used to connect the Site-to-Site IPsec and L2TP VPN connections too. Lastly, I use a VRRP ‘sync group’. The sync group will make sure that if anything in that VRRP group goes wrong -for example, an interface status changes to down- the slave will take over the network traffic as well.
» Click here to show the VRRP configuration
set high-availability vrrp group IPv4_VLAN10 authentication password 'redacted'
set high-availability vrrp group IPv4_VLAN10 authentication type 'ah'
set high-availability vrrp group IPv4_VLAN10 interface 'eth1'
set high-availability vrrp group IPv4_VLAN10 preempt-delay '180'
set high-availability vrrp group IPv4_VLAN10 priority '200'
set high-availability vrrp group IPv4_VLAN10 virtual-address '10.10.10.1/24'
set high-availability vrrp group IPv4_VLAN10 vrid '10'
set high-availability vrrp group IPv4_VLAN75 authentication password 'redacted'
set high-availability vrrp group IPv4_VLAN75 authentication type 'ah'
set high-availability vrrp group IPv4_VLAN75 interface 'eth4'
set high-availability vrrp group IPv4_VLAN75 preempt-delay '180'
set high-availability vrrp group IPv4_VLAN75 priority '200'
set high-availability vrrp group IPv4_VLAN75 virtual-address '10.10.75.1/24'
set high-availability vrrp group IPv4_VLAN75 vrid '75'
set high-availability vrrp group IPv4_VLAN98 authentication password 'redacted'
set high-availability vrrp group IPv4_VLAN98 authentication type 'ah'
set high-availability vrrp group IPv4_VLAN98 interface 'eth2'
set high-availability vrrp group IPv4_VLAN98 preempt-delay '180'
set high-availability vrrp group IPv4_VLAN98 priority '200'
set high-availability vrrp group IPv4_VLAN98 virtual-address '10.10.98.1/24'
set high-availability vrrp group IPv4_VLAN98 vrid '98'
set high-availability vrrp group IPv4_VLAN99 authentication password 'redacted'
set high-availability vrrp group IPv4_VLAN99 authentication type 'ah'
set high-availability vrrp group IPv4_VLAN99 interface 'eth3'
set high-availability vrrp group IPv4_VLAN99 preempt-delay '180'
set high-availability vrrp group IPv4_VLAN99 priority '200'
set high-availability vrrp group IPv4_VLAN99 virtual-address '10.10.99.1/24'
set high-availability vrrp group IPv4_VLAN99 vrid '99'
set high-availability vrrp group IPv4_XS4ALL authentication password 'redacted'
set high-availability vrrp group IPv4_XS4ALL authentication type 'ah'
set high-availability vrrp group IPv4_XS4ALL interface 'eth0'
set high-availability vrrp group IPv4_XS4ALL preempt-delay '180'
set high-availability vrrp group IPv4_XS4ALL priority '200'
set high-availability vrrp group IPv4_XS4ALL virtual-address 'XX.XX.XX.192/25'
set high-availability vrrp group IPv4_XS4ALL vrid '1'
set high-availability vrrp sync-group VLAN member 'IPv4_VLAN10'
set high-availability vrrp sync-group VLAN member 'IPv4_VLAN75'
set high-availability vrrp sync-group VLAN member 'IPv4_VLAN98'
set high-availability vrrp sync-group VLAN member 'IPv4_VLAN99'
set high-availability vrrp sync-group VLAN member 'IPv4_XS4ALL'
Now that the configuration is loaded I can check the status of VRRP with the command ‘show vrrp‘. In the output I can see that the EU-GW04 is now master and EU-GW03 is the slave (backup), just as planned. I should note here that I didn’t create the ‘IPv4_XS4ALL‘ on the EU-GW03 VyOS router yet and therefore it is missing in the output.
EU-GW03:~$ show vrrp
Name         Interface      VRID  State      Priority  Last Transition
-----------  -----------  ------  -------  ----------  -----------------
IPv4_VLAN10  eth1             10  BACKUP          100  19h4s
IPv4_VLAN75  eth4             75  BACKUP          100  19h4s
IPv4_VLAN98  eth2             98  BACKUP          100  19h4s
IPv4_VLAN99  eth3             99  BACKUP          100  19h4s

EU-GW04:~$ show vrrp
Name         Interface      VRID  State    Last Transition
-----------  -----------  ------  -------  -----------------
IPv4_VLAN10  eth1             10  MASTER   15h9m45s
IPv4_VLAN75  eth4             75  MASTER   15h9m45s
IPv4_VLAN98  eth2             98  MASTER   15h9m45s
IPv4_VLAN99  eth3             99  MASTER   15h9m45s
IPv4_XS4ALL  eth0              1  MASTER   15h9m45s
With the configuration in place, I wanted to actually trace the route the network traffic is taking by running the command ‘tracert -d 8.8.8.8‘. Tracert is a super handy tool default present in any Windows computer to check which route network traffic is taking. As a destination, I chose to use ‘8.8.8.8’ which is one of the DNS servers of Google. The ‘-d’ means that it won’t translate the IP-address back to a name. In this case, I’m only interested in the first entry -hop- that shows I’m using EU-GW04 to communicate to the internet which is exactly as I originally planned.
C:\WINDOWS\system32>tracert -d 8.8.8.8
Tracing route to 8.8.8.8 over a maximum of 30 hops
1 <1 ms <1 ms <1 ms 10.10.10.254
<To summarize, the VyOS routers now have a working firewall with the possibility to hand out IP-address and all communication with the VyOS router is working. I’m happy with this part of the configuration, but there’s more to come! The next blog article will be about remote connections! For now, thanks for reading and hopefully you found it interesting and maybe even learned something new! Want to be informed about a new post? Subscribe! Any questions or just want to leave a remark? Please do, I’m very curious what you think of the content. Enjoy your day!