This is the first part of a blog series about the network configuration that I build for my VyOS VM’s. In an earlier blog “VyOS? What is VyOS and why I want to use VyOS!” I’ve already put my thoughts and created a design however this blog series will be more about the why but mainly about the how.
Why a rebuild?
On the 30th of November 2020, I read a blog post of VyOS saying that they offer a free VyOS subscription to certified network professionals. As I hold a CCNA and a VCIX-NV certification, I contacted VyOS and they gave me access to the VyOS LTS images. Already before I replaced my hardware in the datacentre, I used a VyOS VM as a firewall and routing network traffic. Still, I decided to start with a blank sheet for the configuration. I don’t think rebuilding the configuration is extremely complicated but I just need to be aware that I don’t build something that will just not work. Other than that it’s fun to find new ways/features for the configurations- so let’s get to it!
What do I want to achieve?
Before I start building a configuration I need a plan of what I actually need to configure. As I mentioned in “VyOS? What is VyOS and why I want to use VyOS!”, I would like to have a separation between the evil world wide web and some workloads that need protection. I’m for example running a VM with Home Assistant for my home automation and I don’t want anyone else playing with the lights in my apartment. Also, I’d like to be more active with contributions to VyOS by test driving the ‘nightly builds‘ or pre-release builds.
The nightly builds are an extremely experimental build of VyOS that could be either stable or rather unstable. Therefore, I need to have the possibility to change between the two instances of VyOS, so that I can switch between the nightly build and the LTS build. Having two VyOS routers will also provide the needed additional redundancy in my routing.
As explained before I installed two VMware ESXi hosts with local storage, which prevents VM’s from booting on the other ESXi host in case of hardware failure. When one of the ESXi hosts fails, the network shouldn’t go down so the network traffic must re-route to the remaining VyOS router. Re-routing the network traffic is always handy for maintenance but also when I want to test the second VyOS router. Therefore routing must be dynamic so that network traffic can easily be steered around. In short:
- The network design must allow for a failure in the datacentre and still be able to process network traffic.
- My home location must be connected to the datacentre in a secure, redundant manner.
- There must be the possibility to connect to the network in a secure manner from anywhere in the world.
- Keep configuration as simple as possible (KISS) for the primary VyOS.
When I now translate the network design into a drawing, it should look similar to the schema below. Because this is my lab environment it changes quite often but these main parts of the configuration should give me a solid basis for playing around.
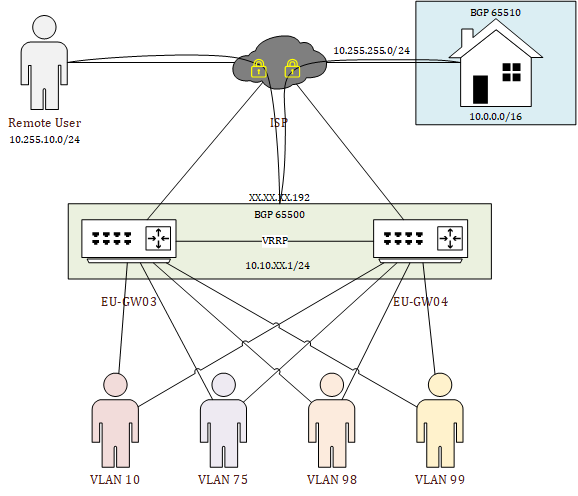
In the top part of the network design, there is a ‘Remote User’ that is able to connect securely to the network from any location also there is my home network connection on the top right. The use of the Virtual Router Redundancy Protocol (VRRP) allows the VyOS routers to share an IP-address between them -more about that in the ‘interface configuration’ part. VRRP will allow me to chose which VyOS router will be handling the network traffic.
Then, in the middle, there are the two VyOS VM’s, which will be separated on their own ESXi host. I like to think big so the hostname will be EU (Europe) GW (GateWay) 0X (same as the ESXi host). The naming is just cosmetic but it will quickly tell me to which VyOS router I’m connected and that is making management easy. This also counts for the IP-addresses. The EU-GW03 will use XX.XX.XX.253 for all interfaces and the EU-GW04 will use XX.XX.XX.254.
There will be four Virtual LANs (VLANs) that will divide workloads and create some separation. VLAN 10 will be for any day workloads and in the end most VM’s will be connected here. I also installed a GNS3 VM that allows me to play with virtual labs networks, but GNS3 has some specific network requirements so that will be placed in VLAN 75. Next to that, I want to have a special VLAN for anything that has to do with VMware, which will be VLAN 98. Additionally, I’d like to separate anything that has to do with management and that will be placed in VLAN 99.
When I started writing this blog post I ended up with one huge post which just became way too long for a single blog post -you’d probably stop reading :). I’ve decided to split this long blog into a whooping 5 parts! The topic for the blogs will be: Design overview, Firewall and Services, Interface configuration, Remote connections, and Routing. In week 11 of 2021, there will be one topic a day that will be published at 10.00 AM, so keep an eye out for those. Once they are online, you can find them listed below:
The next blog article will be about the firewall- and services-configuration! For now, thanks for reading and hopefully you found it interesting and maybe even learned something new! Want to be informed about a new post? Subscribe! Any questions or just want to leave a remark? Please do, I’m very curious what you think of the content. Enjoy your day!